Logo Placement On Shirts - Fashion Forward
Explore the art and strategy behind logo placement on shirts. From classic chest emblems to innovative placements, discover how this design choice shapes brand identity and visual storytelling in the dynamic world of fashion.
Author:Elisa MuellerReviewer:Emily SanchezNov 22, 202353 Shares53.3K Views
Logo placement on shirtsis more than just a design choice; it's a strategic decision that can shape the entire visual narrative of a brand. The position of a logo on a shirt is a silent communicator, conveying style, brand identity, and messaging without uttering a single word.
From the traditional chest emblem to more avant-garde placements, each choice carries its own set of implications. In this exploration, we unravel the nuances of logo placement on shirts, delving into the creative and marketing considerations that make it a pivotal element in the world of apparel design.
Consider The Correct Logo Placement On Shirts
The greatest logo should be able to convey a message in the manner that you desire. It is not just about the design, but also about the proper placement. When it comes to apparel, determining the best logo placement trends in modern fashion can help you determine how much attention it receives from the target audience and how likely it is that people will wear it.
Clothes are a good material for displaying logos to demonstrate your presence. This marketing tactic is used by many firms, brands, and organizations to boost brand memory and reinforce business branding.
There are various popular spots for placing your signs, including the left chest, back collar, and sleeve. Different areas have different strengths and disadvantages, allowing you to select a location based on your tastes. They also provide varying degrees of exposure.
Full front printing, for example, is perfect for firms seeking a direct approach and high exposure, however some consumers may be reluctant to wear the t-shirt around town. Conversely, the sleeve allows you to promote your brand or business more discretely.
Another factor to consider while deciding on the best logo placement on a t-shirt is size. Every position has a defined size that ensures visibility and conformance, resulting in visually appealing clothing.
A excellent design placement entices people to look at it and remember it. As a result, it is critical to ensure that the design is not too low, too high, too small, or anything else that would cause people to dismiss it.
Do you need some fast pointers on where to establish your visual identity? Here's a logo placement guide to help you improve the look of your t-shirt with a sign.
Left Chest
The basic and go-to spot for your brand when providing shirts for employees, event crew, or anything else.
The size is appropriate; approximately 3" to 4" wide and 3′′ down from the collar. Placement may be adjusted to match the size of the shirt, ensuring that it always appears perfect. On the far left.
Image detail is one of the trade-offs for this location. You should avoid designs with a lot of detail because they will be difficult to see. So keep things basic.
Our Art Department can help you with this and, if necessary, simplify your logo. Typically, there is no additional charge.
This is not to be confused with Right Chest, however it is frequently confused. To be clear, the left refers to your left-hand side while you wear it. If you like, right chest is OK, but it is not a standard.
Center Chest
Another classic spot, and it's right where you'd expect it to be: in the middle, on the chest. Because this is a medium-sized pattern, it is generally always fully visible, even when wearing a jacket, hoodie, or open button-down shirt. The "S" on Superman's chest is a Center Chest.
The size is usually larger than a Left Chest but not as big as a Full Front. The width ranges from 6" to 10", with 8" being the most common, and placement is around 4′′ down from the collar. Please explain what you want, or have one of our designers size it for you.
If you want to print a regular front, you can choose between this position and a Full Front (see below). Your order's range of garment sizes may assist you decide; if they skew smaller, especially into youth sizes, go with Center Chest. If they're in the 3XL bracket, you might want to go with a Full Front.
Full Front
We have now arrived at what is most likely the most popular print site. When most people say "front," they mean "Full Front." Full Front is typically 12"w x 14"h, with positioning approximately 3" down from the collar.
This size can appear incredibly huge in certain designs. And, if you have screen printing done, you may wind up with a lot of ink on the shirt, resulting in a heavy print that isn't breathable, commonly known as a "sweat patch" for obvious reasons.
This is the time to consider your print area. In other words, the surface area that your design will cover, comparable to a house's square footage. If your design isn't particularly tall, you can print it broad. If the design is tall, you may wish to minimize the total size.
There are additional things you may do to minimize the overall print area without changing the print size. Let's look at few examples to prove our claim.
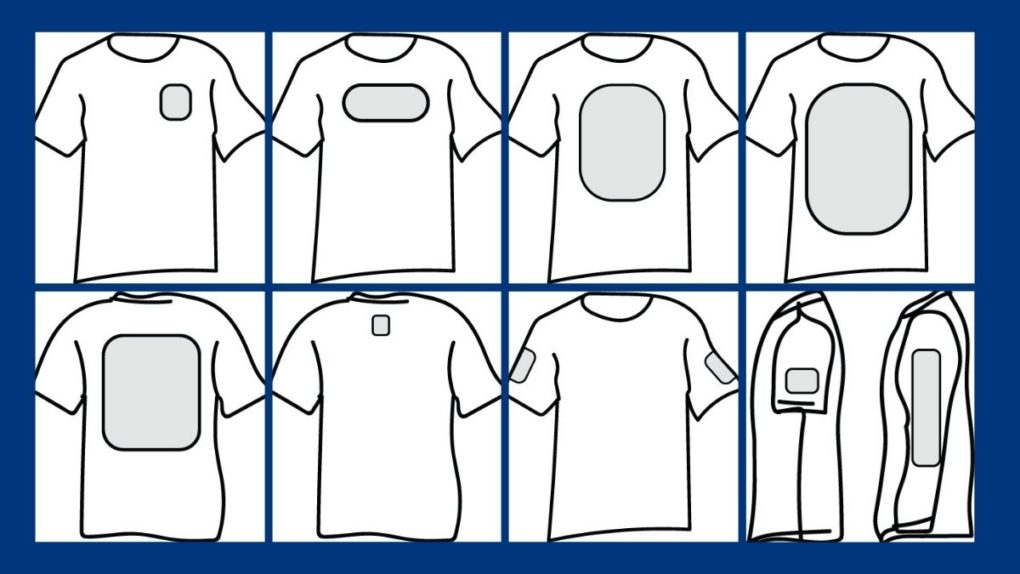
Oversize Front
If you thought Full Front was enormous, wait till you see Oversize Front. As the name implies, it's larger than what should really be printed on a T-shirt. However, enough people enjoy and want it that it makes the list.
Anything larger than a standard-sized Full Front print is considered an Oversize print. Our standard maximum print size is 14" wide by 16.5" high, however we can go larger in specific situations. Placement usually begins higher than a standard-sized front, around 2′′-3′′ down from the collar.
Keep in mind that you may be limited by your garment size. We cannot, for example, print 14" wide on juvenile sizes, smaller ladies' sizes, tank tops, v-necks, and so on. In that instance, you'd need to configure two distinct print sizes.
Some designs lend themselves well to Oversize printing, while others should not be. The same idea that applies to Full Front will apply here: while choosing this size, consider the surface area that the ink will cover.
Here's an example of what to do and what not to do while creating an Oversize print design.
Dos And Don'ts Of Oversize Printing
- Don'ts - The design on the left has a lot of white ink on it. It's a dense print with little breathability. Although there are small gaps where the lines are (which helps keep it flexible), the ink surface is nearly solid. For obvious reasons, this is referred to as a "sweat patch" in jest. Look for strategies to limit the amount of ink used for big prints.
- Dos - The artwork on the right has been altered by "inverting" it, which means moving from positive to negative ink areas. Not every design may be altered in this manner, but many can. This lowered the ink coverage by roughly 80% (if not more), resulting in a lighter, more flexible, more breathable print that is more comfortable and looks better.
Collar/Small Upper Back
This print location began as an alternate and has since grown to become a standard. Similar to Radiohead. Anyway, it's a wonderful spot for a logo, which is normally what gets printed here.
The term "Yoke" refers to the panel on the upper back of old-style cowboy shirts. Back Collar, in our opinion, is more to the point.
Keep the design simple because the average size is smaller than a Left Chest, typically 2" to 3" wide. The placement is about 1" from the collar's edge.
Logos and graphics as small as 1′′ have been seen to work in this position. You may have seen this print placement while standing in line behind someone else; it's right at eye level, so it doesn't need to be enormous.
This size can also be used for the little region on racerback tank tops, so it's ideal for an order that contains those. Because the sleeves and left chest are almost the same size, the same design can be printed on both.
Upper Back
This print position may simply be termed "Back," but the crucial thing to note is that it is located above the shoulder blades.
This is often where you will find the big words "SECURITY" or "EVENT STAFF" or possibly the current hashtag.
The size is normally 12" to 14" wide to ensure that people can read it from a distance. If your design is just a word, don't bother about specifying Upper Back - we'll figure it out and place it roughly 4′′ down from the collar.
Customers occasionally request that this be printed over the bottom of the shirt (or butt area). It's a possibility for promotional tees. While this area does grab the eye, it lacks the prominence of the Upper Back area.
Full Back
The Full Back is a classic and, after the Full Front, the second most popular print placement. However, it is printed somewhat lower and typically larger. The basic print size of 12" wide by 14" high is usually sufficient, but we may go up to 14.5" wide by 16.5" high if necessary - and if the clothing is not too small.
This print location is rarely available on its own. It's frequently accompanied by a print on the front, sleeves, or both. The Full Back looks best when paired with a Left Chest. It is the Big Dipper to the Left Chest's Little Dipper. If you were seeking an astronomical analogy, look no further.
When you need a huge print, the Full Back should be your first option. You can get away with a larger image because it will serve as a better billboard than the front. It's also the best spot to showcase your most colorful and intricate design. Save the single-color prints for the left chest and sleeves.
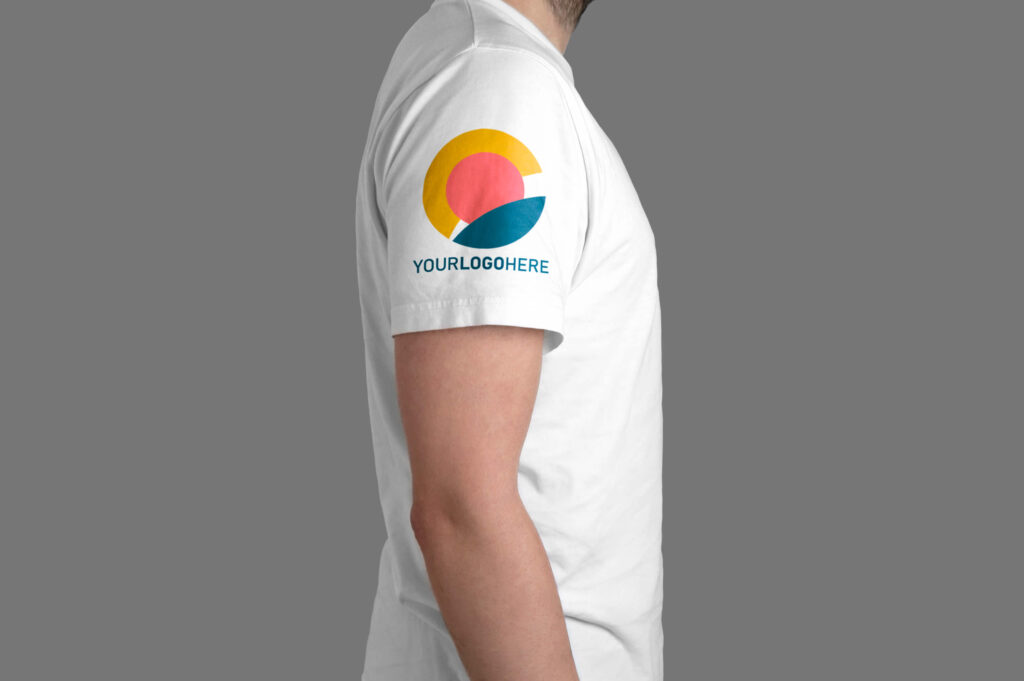
Sleeves
The Sleeve would be missing from this list. This can vary, so make sure you specify what you want if it's not normal. This print spot, like the Left Chest, should be reserved for simpler artwork. And, as with the other spots, the size and placement should be determined by your specific logo or design.
The Sleeve, in particular, benefits from a decreased print size. The normal width is about 3" broad, but we can go as big as 4.5" wide (not suggested unless your logo is really wide) or as small as 1" wide.
The standard distance from the hem is roughly one inch. We've seen some fantastic patterns that are printed larger and higher up on the shoulder. Use caution in this place and don't be afraid to ask one of our project specialists for assistance.
Logo Placement On Shirts - FAQs
Are There Trends In Logo Placement On Shirts?
Yes, trends in logo placement evolve over time. Currently, some trends include asymmetrical placements, oversized logos, and logo placements on the back or collar.
Does Logo Size Matter In Relation To Logo Placement On Shirts?
Yes, logo size is an important consideration. A balanced size in relation to the shirt and its placement ensures that the logo complements the overall design.
How Can Logo Placement Impact A Brand's Marketing Strategy?
Strategic logo placement can enhance brand visibility, contribute to brand recall, and create a cohesive visual identity that strengthens a brand's marketing efforts.
Are There Cultural Considerations In Logo Placement On Shirts?
Yes, cultural preferences and norms can influence logo placement. Brands often adapt their logo positions to align with cultural expectations and aesthetic preferences.
Can Logo Placement On Shirts Be Customized For Different Apparel Types?
Absolutely. Logo placement can be customized based on the type of shirt, such as T-shirts, polos, or button-downs, allowing brands to adapt their designs to suit diverse apparel styles.
Conclusion
In the dynamic landscape of fashion, where first impressions are often visual, logo placement on shirts emerges as a powerful tool for brand storytelling. Whether it's the timeless elegance of a centered chest logo or the modern edge of unconventional placements, the position speaks volumes about a brand's identity.
The art of logo placement goes beyond aesthetics; it's a deliberate expression that influences how a brand is perceived. As we conclude our journey through the realm of logo placement on shirts, it becomes evident that this seemingly small detail plays a significant role in shaping the larger narrative of style and brand presence in the ever-evolving world of fashion.

Elisa Mueller
Author
Elisa Mueller was born in Kansas City, Missouri, to a mother who taught reading and a father who taught film. As a result, she spent an excessive amount of her childhood reading books and watching movies. She went to the University of Kansas for college, where she earned bachelor's degrees in English and journalism. She moved to New York City and worked for Entertainment Weekly magazine for ten years, visiting film sets all over the world.
Emily Sanchez
Reviewer
Emily Sanchez, a Fashion Journalist who graduated from New York University, brings over a decade of experience to her writing. Her articles delve into fashion trends, celebrity culture, and the fascinating world of numerology.
Emily's unique perspective and deep industry knowledge make her a trusted voice in fashion journalism.
Outside of her work, she enjoys photography, attending live music events, and practicing yoga for relaxation.
Latest Articles
Popular Articles