How To Convert Mp4 To Mp3 On Mac?
Discover how to convert MP4 to MP3 on Mac! Learn with step-by-step guides, explore free converters, and optimize audio quality effortlessly.
Author:James PierceReviewer:Elisa MuellerFeb 07, 2024738 Shares67.1K Views
Converting an MP4 file to MP3 on a Mac is a straightforward process, and there are various methods and tools available for accomplishing this task. So, how to convert MP4 to MP3 on Mac? Below are different approaches, including using built-in software and third-party applications to help you convert MP4 to MP3 on Mac.
Even if you typically use a Mac, you occasionally need to use a PC, and vice versa, so you really need to be sure that your music and movies are accessible in a number of formats.
One issue is that mp4 videos don't always have an mp3 sound track. Perhaps you simply must include an MP3 file into a project for a presentation, listen to music on a dedicated music player while on the road, or make sharing with others simpler.
Fortunately, video conversion apps have been around for a while, enabling users to convert MP4 to MP3 files on Mac and PC. This gives you the freedom to always have your favorite songs available.
Here is a detailed guide on how to convert MP4 to MP3 on Mac:
Convert Mp4 To Mp3 Mac Using ITunes (for MacOS Mojave And Earlier)
Are you aware that you can convert MP4 to MP3 audio files for Mac or Windows using iTunes? Apple's iTunes is the best alternative if you're seeking for something the simplest and most direct.
Although it is mainly used as a device administration tool or media player, it can do a lot of artistic things with videos, including extracting audio and saving it as an MP3 file using the handy but unnoticed "Create MP3 Version" feature.
iTunes is most likely already installed on your PC. Let's now look at how to quickly and easily convert MP4 files to MP3 on Mac and Windows using iTunes. Note that since of macOS Catalina 10.15, the Apple Music app has taken the place of iTunes for activities pertaining to audio.
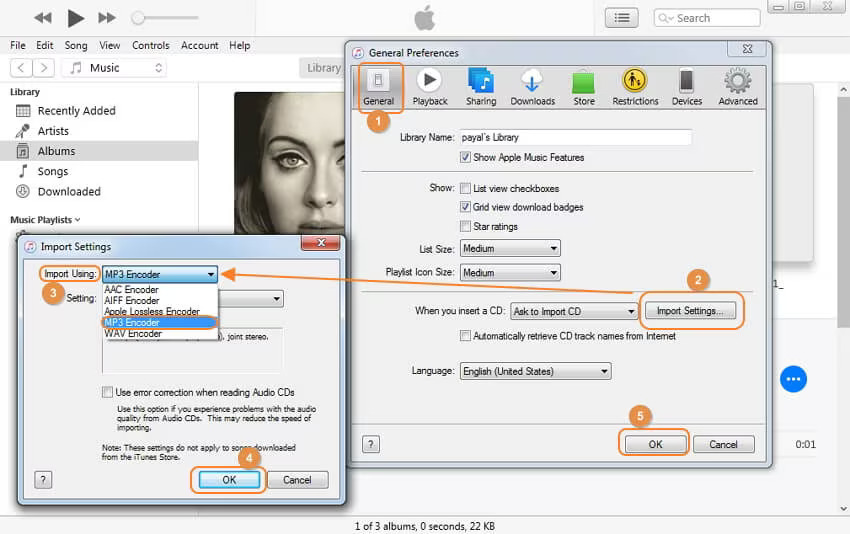
- For users operating on macOS Mojave and earlier versions, iTunes serves as a reliable tool for converting MP4 to MP3 effortlessly. Follow this comprehensive guide to make the most of iTunes' built-in features.
- Launch iTunes on your Mac. Ensure that you have the latest version installed. If not, visit the Apple website to download and install the latest iTunes version.
- Click on "File" in the menu bar and select "Add to Library." Navigate to the location of your MP4 file and select it. This action imports the chosen MP4 file into your iTunes library.
- In the left sidebar of iTunes, under the "Library" section, create a new playlist. Click the '+' icon at the bottom-left corner, give your playlist a name, and press Enter.
- Drag and drop the imported MP4 file into the newly created playlist. This step is crucial for organizing the conversion process within iTunes.
- With the playlist containing the MP4 file selected, click on "File" in the menu bar. From the drop-down menu, navigate to "Convert" and choose "Create MP3 Version." iTunes will initiate the conversion process.
- Once the conversion is complete, the newly created MP3 file will be available in the iTunes library. To find the file, right-click on it and select "Show in Finder." From here, you can copy or move the MP3 file to your preferred location.
Additional Tips
- Batch Conversion -If you have multiple MP4 files to convert, you can add them all to the playlist before initiating the conversion process. iTunes will convert each file to MP3 sequentially.
- File Organization -Utilize playlists to categorize and organize your converted MP3 files within iTunes. This makes it easier to manage your audio library.
- File Quality -iTunes generally provides a standard quality conversion. If you have specific preferences for the audio quality, you might want to explore third-party applications that offer more customization options.
Step-by-step Guide To Convert MP4 To MP3 On Mac Using Finder (for MacOS Catalina And Later)
With the advent of macOS Catalina, Apple introduced a new method for converting MP4 to MP3 using the Finder. This streamlined approach simplifies the process, eliminating the need for additional software. Follow this detailed guide to seamlessly convert your audio files.
- Launch Finder on your Mac. Finder now serves multiple roles, including file management and, in this case, audio conversion.
- Navigate to the folder containing the MP4 file you wish to convert. This can be easily done by clicking on the relevant directories in the left sidebar of the Finder window.
- Right-click on the MP4 file you want to convert. From the context menu, choose "Rename." Alter the file extension from ".mp4" to ".m4a" and press Enter to confirm the change. This step is essential for signaling to macOS that you want to convert the file to an audio format.
- Double-click on the renamed file. By default, macOS will open it with the Music app. The Music app recognizes the file as an audio file and prepares it for conversion.
- In the Music app, navigate to the "File" menu in the menu bar. Select "Convert" and then choose "Create MP3 Version." This action triggers the conversion process, and the resulting MP3 file will be saved in the same location as the original MP4 file.
Additional Tips
- Quality Settings -While the Music app does not provide extensive customization options, the resulting MP3 file typically maintains good quality. If you require more advanced settings, consider using third-party applications.
- Multiple Conversions -This method allows for the conversion of multiple files in sequence. Simply repeat the process for each MP4 file you wish to convert.
- File Management -After conversion, you can easily locate the MP3 files in the same folder as the original MP4s. Use Finder to organize and manage your newly converted audio files.
Use VLC To Convert MP4 To MP3 On A Mac
On both Mac and Windows, VLC is a pinup media player that can play practically any file format. It may surprise you to learn that it also has converting capability, albeit for a limited number of output formats, including MP3, OGG, WebM, FLAC, and so on.
It has a gun-gray symbol and a simple, elegant layout, but it still has a redesigned toolbar and a plethora of customization options that make the converting process easier. The most disappointing thing is that there is no way to convert numerous video files to audio at once with VLC's Mac edition.
- See how to use VLC on a Mac to convert MP4 to MP3.
- Select "Convert/Stream" from the drop-down box when you click "File" on the top toolbar.
- Select "Open media" > navigate to an MP4 file from the destination > select "Open" Alternatively, just place the MP4 files into the designated spot.
- Select "Audio-MP3" as the destination profile. There is a customize button beside where you can change the audio codec.
- Save your file as xxx.mp3 after selecting the "Save as File" option and then the "Brower" button.
Using Third-Party Software
When it comes to converting MP4 to MP3 on a Mac, third-party software offers a flexible and feature-rich alternative to built-in tools. This method provides users with more customization options, advanced settings, and the ability to tailor the conversion process to specific preferences. Here's a detailed guide on using third-party software for MP4 to MP3 conversion on your Mac.
- Begin by choosing a third-party MP4 to MP3 converter for Mac. Popular options include "Any Video Converter," "Freemake Video Converter," and "Audacity." Visit the official website of your chosen software, download the installer, and follow the installation instructions.
- After installing the software, launch it and look for an option to import or add files. Typically, there's a button or menu that allows you to select the MP4 file you want to convert. Use this function to import the desired video file into the converter.
- Once the MP4 file is loaded into the software, navigate to the output settings. Look for an option to choose the output format and select "MP3" as the desired format. Some converters might offer additional settings, allowing you to customize the bitrate, sample rate, and other parameters according to your preferences.
- With the output format set to MP3 and any desired settings configured, initiate the conversion process. This is usually done by clicking a "Convert" or "Start" button. The software will then begin converting the MP4 file to MP3, and the time required will depend on the size and length of the video.
- After the conversion is complete, the software will typically provide an option to open the folder containing the converted MP3 file. Click on this option to access the newly created audio file. From here, you can copy or move the MP3 file to your preferred location.
Using Filme
Convert MP4 to MP3 Files An all-in-one video editor that's ideal for novices is iMyFone Filme Filme. Both Mac and Windows users can access it. It is an expert video editor with the ability to convert between different video formats. Your MP4 video files can be readily converted to MP3 format. Anyone can edit and convert video formats like a pro by following a few easy steps.
- Setup and launch Filme on your gadget. You will notice the navigation bar at the top of the screen. Select the File option to open the New Project. Select any of the various ratio options that are displayed to you. Videos should have an aspect ratio, however since we are converting the video to MP3, you are free to choose any aspect ratio.
- Choose the import file from your device option under Media. To convert an MP4 file to an MP3 format, you must import it. Importing video from your mobile device can also be accomplished using a USB connection or a QR code.
- Drag the video that was imported into the timeline now. You may edit your video here. Additionally, you can alter the video's duration by cropping it. Remember that if you trim the video, the audio file will also be trimmed. Using this method, you can remove any portion of the video.
- After finishing the editing of your video, click the Export button to bring up a new window. You must choose the MP3 option located on the lower left side of this window. Additionally, there is a Settings option where you may adjust the bitrate, sampling rate, and channel.
- When you finally click the Export option, your file will be saved on your device in the location you have chosen.
Additional Tips
- Batch Conversion -Most third-party converters support batch conversion, allowing you to convert multiple files simultaneously. This can be a time-saving feature when dealing with multiple MP4 files.
- Quality Control -Take advantage of the advanced settings offered by third-party software to control the quality of the converted MP3 files. Adjusting parameters like bitrate can impact the audio quality.
- Explore Additional Features -Some converters may come with additional features, such as editing tools, the ability to extract audio from video clips, or even the option to create custom ringtones. Explore these features to make the most of the software.

CloudConvert
Do you just wish to convert MP4 to MP3 Mac online without having to set up any software on your PC? There are still plenty of online-only businesses available to meet your demands for video conversion.
CloudConvert.com is one of the top web resources available. It is easy to use, free of cost, and capable of instantly converting a wide variety of file types. Before beginning the conversion, you can adjust a number of output parameters, including codec, aspect ratio, bit rate, channel, and resolution.
Unfortunately, if you need to convert more than 25 videos in a day, you have to pay for a package plan that includes conversion minutes or subscribe on a monthly basis. Here's how to use CloudConvert to convert a.mp4 file to a.mp3 online.
- Open the CloudConvert website in the web browser on your Mac.
- To upload your MP4 file for conversion to MP3, click Select File.
- From the list of export options, choose MP3.
- Press Convert.
How To Convert MP4 To MP3 On Mac? - FAQs
How To Convert MP4 To MP3 On Mac Using ITunes?
Open iTunes, import the MP4 file, create an MP3 version through the "Convert" menu, and locate the converted file in the iTunes library.
Are There Third-party Converters For Mac?
Yes, you can use software like "Any Video Converter," "Freemake Video Converter," or "Audacity" for more control over the conversion process.
How To Convert MP4 To MP3 With Audacity On Mac?
Download and install Audacity, import the MP4 file, choose export as MP3, and specify the desired settings before exporting.
What Is The File Extension For MP3 In ITunes?
The MP3 file created in iTunes has the ".mp3" file extension.
How To Change File Extension On MacOS?
Right-click on the file, select "Rename," and change the file extension. Confirm the change.
Can I Convert Multiple MP4 Files To MP3 At Once In ITunes?
Yes, you can create a playlist and convert multiple files simultaneously using iTunes.
Are There Any Free MP4 To MP3 Converters For Mac?
Yes, you can use free converters like "Any Video Converter" for basic conversions without any cost.
Conclusion
The most widely used video format in use today is MP4 (MPEG-4), which can be found in anything from the newest Blu-ray players to older mobile phones. Due to the format's extreme flexibility, it can manage both low-res mobile videos and big 4K video files with ease.
Due to MP4's widespread usage online, it's probable that any music videos or TV shows you download will be in MP4 format. However, you might occasionally need to convert your video to an audio file. It might be better to convert it to one of the most widely used audio formats, MP3.
So, how to convert MP4 to MP3 on Mac? Converting MP4 to MP3 on a Mac is a task that can be accomplished using built-in tools like iTunes or Finder, as well as third-party software offering more customization options.
Choose the method that best suits your preferences and needs. Whether you opt for the simplicity of built-in tools or the additional features provided by third-party applications, the process is generally user-friendly and efficient.

James Pierce
Author

Elisa Mueller
Reviewer
Latest Articles
Popular Articles