Headphone Cleaning Essentials - Keeping Your Headphones Fresh And Functional
Headphones have become an integral part of our daily lives, providing us with an immersive audio experience. Over time, headphones can accumulate dirt, oils, and debris, which not only compromise their aesthetics but also affect their sound quality and overall performance. In this article, we will discuss the headphone cleaning essentials, including the tools, techniques, and tips to keep your headphones clean and in optimal condition.
Author:Elisa MuellerReviewer:James PierceJun 01, 202366.2K Shares920.1K Views

Headphones have become an integral part of our daily lives, providing us with an immersive audio experience. Over time, headphones can accumulate dirt, oils, and debris, which not only compromise their aesthetics but also affect their sound quality and overall performance. In this article, we will discuss the headphone cleaning essentials, including the tools, techniques, and tips to keep your headphones clean and in optimal condition.
Cleaning Tools
Check out these cleaning tools as one of the headphone cleaning essentials:
Soft Cloth Or Microfiber Cloth
A soft cloth or microfiber cloth is a fundamental tool for headphone cleaning. These gentle materials are excellent for removing surface dust, fingerprints, and smudges from the headphones' exterior.
The soft texture helps prevent scratches or damage to the headphone's finish. Microfiber cloths, in particular, are highly effective at trapping and lifting dirt particles, leaving your headphones looking clean and polished.
When using a soft cloth or microfiber cloth:
- Gently wipe the surfaces of the headphones, including the ear cups, headband, and exterior components.
- Pay attention to intricate details, such as buttons, controls, and branding logos, to ensure a thorough clean.
- Avoid using excessive force or pressing too hard to prevent accidental damage.
Cleaning Solution
A suitable cleaning solution is essential for tackling more stubborn stains, oils, or grime that may have accumulated on your headphones. It is crucial to use a mild cleaning solution specifically designed for electronics. Avoid using harsh chemicals, solvents, or abrasive cleaners that can damage the headphone's surface or internal components.
You have a few options for a cleaning solution:
- Commercial Electronics Cleaning Solution -Many electronics stores offer specialized cleaning solutions formulated for safely cleaning headphones and other devices. These solutions are designed to be gentle yet effective at removing dirt and grime.
- DIY Solution - You can create your own cleaning solution by mixing water with a small amount of gentle soap or dishwashing liquid. Ensure that the solution is diluted properly to avoid leaving residues or causing damage.
When using a cleaning solution:
- Apply a small amount of the solution to a soft cloth or microfiber cloth, ensuring it is slightly damp but not soaking wet.
- Gently wipe the surfaces of the headphones, focusing on areas with stubborn stains or oils.
- Avoid getting the cleaning solution into any openings, such as speaker grilles or headphone ports, as excessive moisture can damage the internal components.
Cotton Swabs
Cotton swabs, often referred to as Q-tips, are handy tools for cleaning hard-to-reach areas of your headphones. These small, cylindrical swabs with cotton tips can effectively remove dirt or grime from crevices, gaps, or other tight spots.
When using cotton swabs:
- Moisten the cotton tip with a small amount of the cleaning solution or use them dry for gentle dusting.
- Carefully maneuver the cotton swab in the targeted areas, such as the gaps between the ear cups and headband or around buttons and controls.
- Exercise caution to avoid applying excessive pressure or pushing debris further into the headphones.
Compressed Air Or Dust Blower
Compressed air or a dust blower is an invaluable tool for removing dust particles from hard-to-reach areas of your headphones. These tools utilize bursts of compressed air to dislodge and blow away dust and debris, ensuring a thorough clean.
When using compressed air or a dust blower:
- Read and follow the instructions provided with the can of compressed air or dust blower.
- Hold the can or blower at a safe distance from the headphones to prevent any potential damage from the force of the air.
- Use short bursts of air to target speaker grilles, headphone ports, crevices, or any areas where dust tends to accumulate.
Toothbrush Or Soft Bristle Brush
A toothbrush or soft bristle brush can be useful for more extensive cleaning of your headphones. These brushes are ideal for gently scrubbing the surface of the headphones and dislodging stubborn dirt or debris.
When using a toothbrush or soft bristle brush:
- Choose a toothbrush with soft bristles or a specialized soft bristle brush suitable for electronics cleaning.
- Apply a small amount of the cleaning solution to the brush or use it dry for dry brushing.
- Gently scrub the surfaces of the headphones, focusing on areas that require extra attention.
- Be cautious not to use excessive force or scrub too vigorously, as it may damage the headphone's finish or delicate components.

Tech Minute: Headphone Cleaning Essentials - A Cleaning Kit For The Masses - 6' Networks, LLC
Cleaning Techniques
Regular cleaning is crucial to maintaining the performance, sound quality, and hygiene of your headphones. By following proper cleaning techniques, you can effectively remove dirt, oils, and debris that accumulate over time. In this article, we will explore various cleaning techniques that will help you keep your headphones clean and in optimal condition.
Surface Cleaning
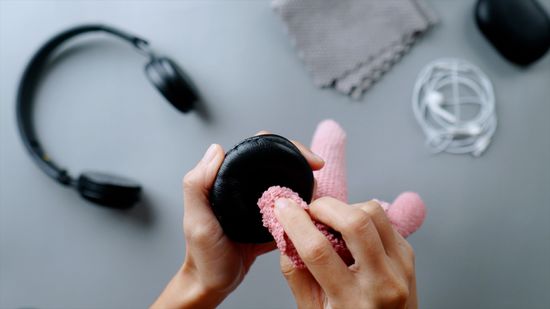
Surface cleaning is the first step in maintaining your headphones' cleanliness. Start by unplugging your headphones and using a soft cloth or microfiber cloth to wipe the surfaces.
Gently remove any visible dirt, dust, or fingerprints from the ear cups, headband, and other exposed parts. Ensure that the cloth is clean and free from abrasive particles that could scratch the headphone's finish. Avoid applying excessive pressure, as it may damage delicate components.
Ear Cushion Cleaning
If your headphones have removable ear cushions, it's important to clean them regularly. Follow the manufacturer's instructions to detach the ear cushions safely. Most ear cushions can be cleaned by wiping them with a slightly damp cloth.
Ensure that the cloth is not overly wet, as excessive moisture can seep into the cushion's foam and affect its integrity. After cleaning, let the cushions air dry completely before reattaching them to the headphones.
Deep Cleaning
For a more thorough cleaning, you can perform a deep clean to remove embedded dirt, oils, and grime. Start by dampening a soft cloth or cotton swab with a mild cleaning solution specifically designed for electronics.
Gently wipe the surfaces of the headphones, paying attention to areas prone to dirt build-up, such as the ear cup openings and headband joints. Ensure that the cloth or cotton swab is only slightly damp, as excessive moisture can damage the headphone's internal components.
Avoid applying the cleaning solution directly to the headphones. Instead, apply it to the cloth or cotton swab and then clean the surfaces. It is essential to be cautious around the headphone drivers and controls to prevent any liquid from entering and causing damage.
Speaker Grille Cleaning
The speaker grilles of your headphones can accumulate dust and debris over time, affecting sound quality. To clean them, use a can of compressed air or a dust blower.
Hold the can or blower at a safe distance from the headphones and use short bursts of air to remove the dust particles. This will prevent any excess force or moisture from damaging the headphone's drivers. If necessary, gently wipe the speaker grilles with a soft cloth or cotton swab moistened with the cleaning solution.
Cable Cleaning
The cables of your headphones can also accumulate dirt and oils. To clean them, wipe the cables with a slightly damp cloth or a cloth dipped in a mild cleaning solution. Be careful not to apply excessive moisture, as it can damage the cable's insulation or connectors. After cleaning, let the cables air dry completely before using them.
Control And Port Cleaning
If your headphones have controls or ports, it's important to keep them clean to ensure proper functionality. Use a soft cloth or cotton swab lightly moistened with the cleaning solution to wipe the controls and ports. Be gentle and avoid getting the solution into the openings, as it can cause damage. Allow the controls and ports to dry completely before using the headphones.
Tips For Maintaining Clean And Hygienic Headphones
Proper maintenance is essential to preserve the longevity and performance of your headphones. By implementing a few simple tips and practices, you can keep your headphones in excellent condition and enjoy a high-quality audio experience for years to come. In this section, we will explore valuable tips for headphone maintenance that will help you optimize their performance, prevent damage, and ensure long-lasting enjoyment.
Handle With Care
One of the fundamental aspects of headphone maintenance is handling them with care. Avoid rough handling, excessive bending, or twisting of the cables, as this can cause internal wire damage or connector issues. When putting your headphones on or taking them off, do it gently and avoid pulling or yanking the headband.
Regular Cleaning
Make headphone cleaning a regular part of your maintenance routine. Depending on usage, clean your headphones every few weeks or as needed to prevent dirt build-up and maintain optimal sound quality.
Store Properly
When not in use, store your headphones in a clean, dry case or a protective pouch to prevent dust accumulation and minimize exposure to potential damage.
Avoid Excessive Moisture
Be cautious while cleaning your headphones, particularly around the controls, ports, and drivers. Excessive moisture can damage the internal components or compromise the headphone's functionality. Use minimal moisture when cleaning and ensure that the headphones are completely dry before use.
Follow Manufacturer's Instructions
Different headphone models may have specific cleaning guidelines provided by the manufacturer. It is important to follow these instructions to avoid any potential damage and maintain the warranty coverage.
People Also Ask
How Frequently Should Headphones Be Cleaned?
The frequency of earbuds or headphone cleaning is not governed by any hard and fast rules. Depending on how frequently you wear your headphones, what you're doing while wearing them, and the temperature where you reside, the frequency may alter.
Can I Use Regular Cleaning Solutions To Clean My Headphones?
No, it is advisable to use a mild cleaning solution specifically designed for electronics or make a DIY solution using water and gentle soap. Avoid using harsh chemicals that can damage the headphone's finish or internal components.
Can I Submerge My Headphones In Water For Cleaning?
No, submerging your headphones in water can damage the internal components. Instead, use a slightly damp cloth or cotton swab to clean the surfaces.
How Should I Clean The Ear Cushions Of My Headphones?
If your headphones have removable ear cushions, you can clean them by wiping with a slightly damp cloth. Ensure they are completely dry before reattaching them to the headphones.
Is It Safe To Use Compressed Air To Clean My Headphones?
Yes, using a can of compressed air or a dust blower can effectively remove dust particles from headphone crevices and speaker grilles. However, it is important to use the compressed air in short bursts to avoid pushing debris further into the headphones.
Conclusion
Proper maintenance and regular cleaning are vital to keep your headphones in pristine condition and ensure a satisfying audio experience. By utilizing the essential cleaning tools, techniques, and following the maintenance tips of headphone cleaning essentials outlined in this article, you can effectively remove dirt, dust, and grime from your headphones while preserving their functionality and extending their lifespan. Embrace the headphone cleaning essentials to enjoy clean, hygienic, and high-quality audio for years to come.

Elisa Mueller
Author

James Pierce
Reviewer
Latest Articles
Popular Articles
